¶ Importing Garments and Binding them
The Fvne plugin for Blender is required for this one. You can find it [here]
Clothing your character is likely the most advanced part of making a character for Fvne, and will ask that you go beyond what this guide and other guides have to offer.
That is because a lot of clothing hinges on the aspects of making your own model through a third party app like Blender.
¶ 1. Exporting your own Character to Blender
The first steps to clothing your character is to fit a model with clothing in a third party app such as Blender.
- Export your character as a model by going to the upper left menu bar; File > Export > Mesh in a desired location.
(You can export the character in different poses using pose mode) - In blender, File > Import > Wavefront (.Obj) and choose the exported mesh.
Use the character model exported and then imported into blender as your reference.
The model exported can be exported in different poses.
This can be done via Pose mode, or Advanced > Bind Poses.
It is important that the clothing fits the designated pose, as the cloth will late try to bind to that character and pose.
¶ 2. Create clothing
This is not about how to create clothing, however.
With some repetition, It is advised that you create and fit the clothing to the pose as it will be bound to the character using that pose when put into Fvne.
We cannot cover all the basis of Blender, and model/cloth making is a large chunk of handling Blender itself.
All we can say is that when it comes to blender you will have to do some of your own research, and begin your journey with navigating the Blender interface!
Here are a few helpful links:
Firstly, a Guide by Blacky as collected by Mobiousscarf. 2 Users of Fvne.
Cloth making guide
One feature one can add to a clothing is shapekeys. These shapekeys are added just like Custom Offset shapekeys without any naming convention.
These shapekeys can be used during pose mode.
Another guide by the two.
NEW! Now containing a guide for cutting holes out of your garments on shape key basis.
Cloth Shape Keys
You can find more guides collected by Tabby here:
Collection of guides
¶ 3. Export Clothing
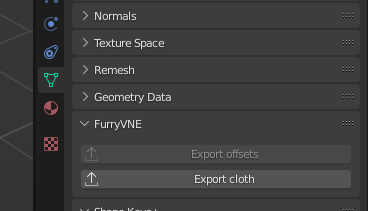
The plugin should come with a few new options in the Object Data Properties in blender.

- The selected cloth model will export itself as .fvne_cloth when you click on the "Export cloth" option.
- The .fvne_cloth will retain any shapekeys for use in pose mode.
¶ 4. Importing Clothing
- In Fvne, Import your clothing in the upper left menu bar; Import > Cloth
- Select your clothing that is the .fvne_cloth file format.
- The clothing should now be selectable using Areola & nipples or Garment feature in Fvne.
¶ 5. Adding the clothing
- In the outliner; Advanced > Clothing > Garment, click on the "+" symbol which will add a new unnamed "Garment".
- Select the new "Garment"
- In the Properties, you can select a new model. Select the cloth model you have imported.
Only .fvne_cloth files are accepted.
This means, regardless of being labeled a "garment" or clothing, it can be used and made for fairly anything, even reasonable bodily features/extensions. - You can also check/uncheck Part of Body to make the clothing a part of the character or not.
This will also include/exclude the verticies count from being clothing or not.
Part of Body "garments" also typically cannot be "Deactivated" during pose mode. - You can also change the TextureResolution from 514 to lower or higher.
- Finally, you can rename the "Garment".
¶ 6. Binding the clothing
- When you expand Advanced > Clothing > "Garment", you will see Shapes > Basis.
Within the "Garment" in general you have:
Coloration, which includes layers and masks.
Shading, wich includes Material, Detailtexture and Pixeloffset
The 3 new elements are: ExclusionMasks (Universal), SmoothingMask (PerGarment) and most importantly Basis (PerGarment and Shapekey)
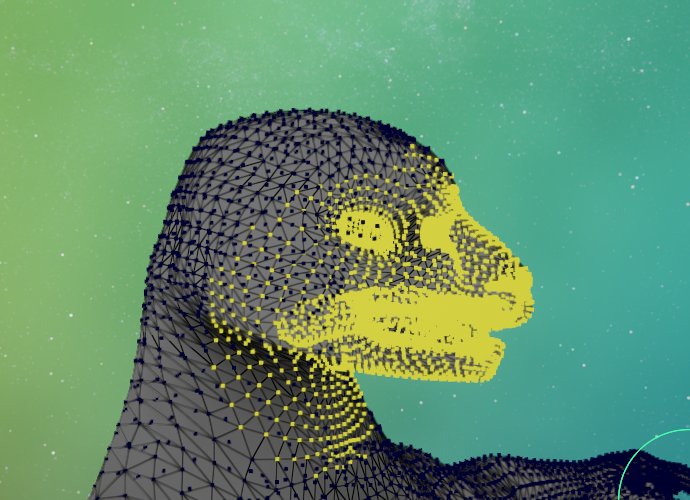
- ExclusionMasks is a mask that you apply to the character model.
This exclusion mask when applied to a garment will ignore cloth binding in the designated area for a specified garment, when that garment is active.
To apply: Add a new exclusion mask, and in the properties, Edit Mask.
You can paint and select an area, with access to different culling modes. (We suggest you turn on OFF or BACK modes)
Exclusion Masks are great for making pieces of clothing (or other) not bind to pieces of the character model.
An example is hairs made as cloth, bound to the head.
Do not forget to "Apply" on the upper left menu bar.


- SmoothingMask only applies per garment.
It works similar to ExclusionMasks but their function is to smoothen the designated parts of the clothing.
SmoothingMasks only are active if "Use Smoothing" is enabled and the mask designated.
Do not forget to "Apply" on the upper left menu bar.
¶ Basis
- Basis is the most important feature that allows you to bind the clothing and stick it to the character.
Within "Garment" > Shapes, you see Basis and any other shapekeys you added.
Extra shapekeys will be added as their own name when applied in blender and can be renamed in Fvne.
Basis within properties have a bunch of different options for you to optimize the clothing with.
- HideShaft lets you hide the Shaft of a male gender specified character.
- PoseType lets you reference the pose needed to bind the clothing.
For example: If the clothing was made on the character while it was standing with their legs straight instead of spread.
You switch the PoseType between SELF_CONTAINED and REFERENTIAL.
SELF_CONTAINED is the pose as is, and contains an EditBindPose button for you to edit the current pose.
REFERENTIAL adds a new box for you to select an already made pose. These poses are made within Advanced > Bind Poses.
- ExclusionMask lets you add an exclusion mask.
- Mode, Per and Method can be important selections to switch between to make the clothing bind properly.
Mode has SURFACE and BONES.
SURFACE fundamentally binds the clothing to the surface of the character mesh.
BONES fundamentally binds the clothing to the bones of the character and Excludes METHOD as a factor.
Per has PER_VERTEX and PER_ISLAND.
PER_VERTEX will make each vertex of the clothing bind.
PER_ISLAND will make each Island of the clothing mesh bind to the character mesh.
Method is only available with Mode: SURFACE and has DIRECT and NEIGHBOURS.
DIRECT is binding one face to their closest verticies.
NEIGHBOURS which is the same but collects neighbouring vertices from that one verticies.
What it all means, is that you can create certain clothing, or "garments" to behave differently.
If you have a loose cloth with high vert count, Surface-Vertex-Neighbours might be the required combination.
If you have a Solid piece of clothing, Bones-Vertex might be the best combination.
They all apply when you hit the bind button and can be benchmarked in Posemode to see if it behaves as intended.
Feel free to experiment with any combinations.
- Smoothing lets you add smoothing to the "garment".
What this does is it eases any bends and changes the clothing has.
You must always designate the smoothing with a SmoothingMask from Clothing > "Garment" > SmoothingMask for the smoothing to take effect.
You can also give the Smoothing a number of times it will smooth the binding. - Cover lets you check/uncheck different parts of the body to automaticity cover any fur.
Fluff will always be covered as long as the Fluff Appendage has the "ClothesCover" checkmark checked.
If the cover feature fails to remove certain parts of the fur, you can use the RemovalMask and designate where to remove fur yourself when
whenever this garment is active. This RemovalMask is based off of Coloration > Masks within the Character.
Know that each new garment will need to be bound. As well as each new shape of a single garment.
¶ 7. Benchmarking
It is incredibly important to test out the cloth and see if it binds properly.
Feel free to move around your character to see the limitations of the clothing if there are any.
To find the different shape keys:
- Open up Pose mode
- In the upper right, where your character name is, contains Garments, Parts and Pelvis.
Expand Garments. - Find the garment and click it
- In the properties, a new Shape box with Basis will be seen and can then select other shapes.

Next Page [Custom Offsets]