¶ Coloration and Masks
Making the masks, and fixating the Coloration to the masks is one of the more lengthy processes of Fvne because its one of the more creative and free form areas of the App and the Character creator. For an extensive detail over Coloration options, go to [Mask and Layer Options in detail]
Coloration, and by proxy the masks, are easy to understand once you get the basic principles behind them.
You need to combine Layers and Masks if you want to set up different effects (Such as color or Smoothnesses) at a desired area.
Here is a basic walk-through:
- You add a new Colour (Or do it later)
- Add a Mask (To choose where something will be affected)
- Add a Layer (In this case it will be the Fill layer)
- Connect the Layer with the Mask (Within the Layer)
- Choose the colour from the colour index (Within the Layer)
There are an incredibly number of options for Coloration and Masks to interact and make the character that you want come true.
But for the purposes of this Basic Guide we will stick with fundamentals to help you start wielding the options.
Just Remember:
A Layer is filled with a Color (Or other effects) according to a Mask
¶ Step 1: Choose a base color
- In Coloration > Colors, in the Properties menu, Choose a color for the #1 box.
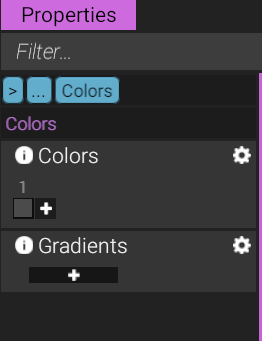
- Click on the Grey box under the number displaying as 1, you will be greeted with a new window for choosing colour.
- (Choose the colour your character will likely be dominant with)
- The + icons add a new Color or Gradients. This will be used later.
¶ Step 2: Make a Mask (Masking Basics)
- Click on the + icon next to Masks
- This extends to a list of choices. For now, choose Radial Gradient
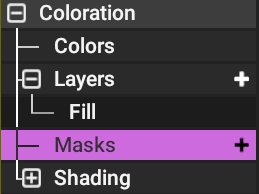
- The character will turn Black. You are currently editing the mask as long as it is selected in the masks list.
- Ctrl+Click anywhere on your character to have the masks position appear where you have selected.
- You will normally see the mask as a white presence.
- You can use the X Y Z (Red, blue, Yellow) Arrows to navigate this Mask
- In the properties, you can change the Size and Gradience of the mask.
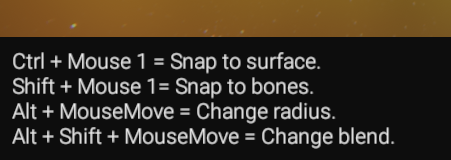
- Alternatively, you can hold Alt+Mouse to change Size, or Shift+Alt+Mouse to change the gradience.
Remember to look at the lower left tooltip.
What you are choosing, is where a Layer will make effect.
White is where it will take effect, Black where it wont.
Radial Gradient is a 3D mask.
You can think of it as a sphere, where the center of the sphere means full influence, and the surface of the sphere means no influence, and anything in between is blended, creating a smooth transition. The 3D mask applies itself however close, in and out of the character it is. You can envision it as an invisible ball that is seen only as a shadow touching a surface.
You can rename the Mask as well for better clarity as you move forward.
¶ Step 3: Make a Layer (Layer Basics)
- Add a new Layer with the + icon on Layers. A list appears.
- For now, select Fill
- Fill, is a simple Layer. All it does is fill itself a Colour.
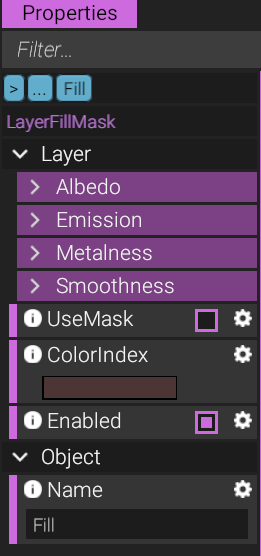
- Activate the box next to "UseMask"
- A mask target appears, click it (Where it says 'None')
- A list of the current masks appears, select the one you made and press OK
- Click on ColorIndex coloured box.
- A small window will appear of the colour that are within the character.
- You can directly add a new colour by pressing the + icon. Or select one.
(For this sake, choose a colour that is different from the base colour. In other words: Make colour 2, be very different from colour 1) - Select the new colour
You have now essentially added a piece of colour on to the character, uniquely to the way the mask was layed out.
¶ Layer Options Recommendations
We recommend that you stick to the Fill layer option when creating a new layer.
But feel free to mess around with the other options. We recommend:
- Fill Layer option is the most fundamental and most trustworthy layer to use. Remember, that the Layers function as a Hierarchy, so the Top Layer is the layer in the Back. Bottom is the one in the front.
- Gradience is similar, but instead uses the Gradience Index instead of the Colour Index.
- Alpha lets you choose something (The masks target) to be transparent or completely invisible.
- You can Move Layers by Right Clicking a layer, and a list of options will expand to "Move up" (or down) in the hierarchy.
Within a Fill layer, you might have noticed a set of extra options that you can expand.

These options let you make the surface feel and look different and we recommend you mix and mash these to see how they affect each other.
- Albedo, is the direct visibility of the Layer. It has an Opacity slider and a selection of Blend modes. Blend modes is literally how it will blend and interact with other Layers. If you understand this, you might be familiar with it from something like Photoshop. Otherwise, ignore it and leave it at Replace.
- Emission, is making that surface/masked area glow (or not). Also comes with Blend modes.
- Metalness, is making the surface look less organic. Its in the name. It makes something look like metal.
- Smoothness, affects the glossiness of something.
The first Fill layer that comes with a blank character starts at 0.4 Smoothness (at 100% opacity).
You can always replace it. If you are making a fuzzy/furred character, a smoothness level at 0.2 is generally more pleasing.
New Fill layers are at 0 in everything except Albedo. To have one part smoother than the other, you can increase the Opacity of one aspect in one layer that is in front of another layer to make that aspect replace the one it is in front of.
You will have to think crafty when you have overlapping effects to subtract or add with each other. Keep the fundamental of the Hierarchy in mind and it should make sense.
(Top layers are in the back, Bottom layers are to the front)
¶ Mask Options Recommendation
Masks are essentially just a way to target where you want a layer to take effect. The list of masks can increase, so there are tricks to decrease the amount of clutter and connections to layers to make things simple and easy.
But first, here are some recommendations:
- Areola, Anus, Vagina, Mouth, Teeth and Eyeliner Mask options when selecting a new mask are simple pre-made texture masks that target where they say they will target.
- Decal Group lets you add a decal, image or something in many quantities in a rudimentary simple way. There are pre-made Eyebrow Decals ready for you to make use of.
Make sure to find the extra window that pops up for editing. - Radial Gradience, Capsule Gradience are fundamental 3D masks.
- Operation lets you combine many masks together, or subtract masks from each other. Operations are a great way to optimize many masks into one layer. Just have the layer reference the Operation mask. To have Operation behave to collect masks, simply set the blend mode to Linear_Dodge. And then Drag and drop the masks into the operation Mask list. To subtract one mask from another, Set the blend mode to Subtract. Add a mask on the top in the operation list, any mask after the first will subtract from the first mask.
FILTERS
To further optimize the use of masks, you can add a filter to one.
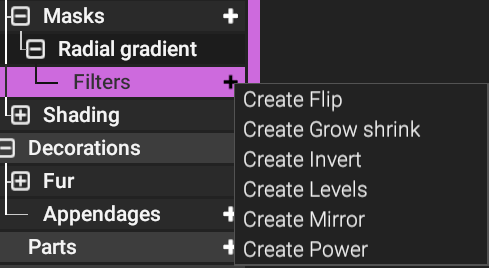
- Click on the boxed [+] on the left of the mask to expand and reveal filters.
- Click on the + on the right of it to add the different Filters.
Biggest recommendation is
- Mirror (Mirror something from one end to the other, as in the mask affects both the arms instead of just the one).
- Invert (invert the mask, so that its target is the opposite).
- Levels (If the size and blending is hard to fine tune, Levels allow you to tune them even more precisely)
¶ Colour Options Recommendations
Coloration > Colors allows you to also set a Gradient Index.

Gradients references the Colors.
There are features out there that either reference the Color Index or the Gradient Index.
Additionally, you can delete colours with a Right Click.
Always feel free to come here to change things.
Remember
Parts, Tongue and Shaft (the penis) have their own isolated Coloration, masking and layering. You must find each of them and give them similar treatments individually.
Next Page [Eyes and Eyelashes]