¶ Appendages - Fluff
Fluff is a feature that lets you add detail that juts out of the character in one way or another.
Usually in the form of a strip. Although the alpha mask that you give it can transform it to look like many things.
Often used as a form of adding fake fur.
You add a Fluff Appendage by clicking the + icon on Decorations > Appendages, and choose Create a Fluff Group.
Parts also have this feature.
For an advanced guide on how to use fluff, go to [Hair by only using Fluff Appendage]
¶ Sculpt Tool

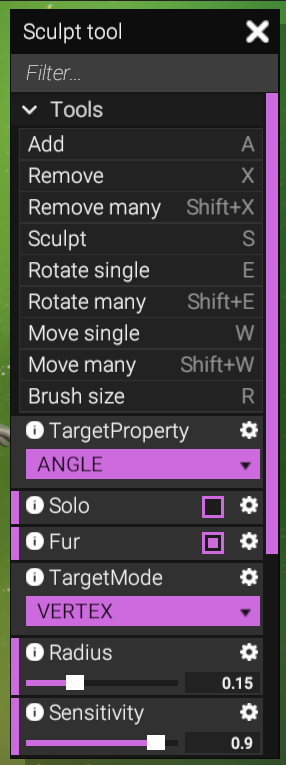
When adding a Fluff Group and selecting it, the Properties will change as well as a new window called Sculpt tool will appear.
The Sculpt Tool window is for directly making edits to the fluff group on the character or part.
- Add sets you in add mode, places a strip of fluff when clicked on the character.
You can also click(hold) and drag a direction to have the added fluff rotate to the desired direction before placing. - Remove sets you in Remove mode, highlights a fluff piece in red when hovering over a piece.
- Remove Many targets any in the size of the brush to be removed on click.
- Sculpt is the most important tool. Sculpt lets you make the TargetProperty have an effect on the fluff piece in a brush.
Click+Hold and Moving the mouse adds the effect while Ctrl+Click+Hold while moving adds the effect in the other direction.
Shift+Click+Hold while moving homogenizes the the effect to be similar to others, otherwise called smoothing. - Rotate single highlights a fluff piece in red when the mouse is hovered over it to then be selected (Click+Hold) and dragged around.
- Rotate many lets you select and rotate all in the size of the brush (Click+Hold).
- Move single lets you highlight a fluff piece in red to then select and move around (Click+Hold).
- Move many lets you select and move all in the size of the brush (Click+Hold).
- Brush Size sets you to resize the brush by moving the mouse in or out, click to confirm.
Target Property has many modes. These modes need Sculpt to give its effect to the fluff pieces.
- Tilt lets you sculpt the fluff pieces into rising or lowering entirely from its root as its pivot point.
- Angle combines both Starting_Angle and Ending_Angle to make the effect.
- Starting_Angle lets you bend the fluff pieces from the lower end.
- Ending_Angle lets you bend the fluff pieces from the upper end.
- Twist makes a spin to the fluff.
- Bend pushes the fluff pieces to make a turn.
- Size combines both Length and Width to make the effect.
- Length adds more surface to the fluff pieces along its length.
- Width stretches its surface along its sides.
- Color_Alpha sets the opacity of the Color Mask and its colour.
- Color_Emission sets the emission levels of the Color mask and its colour (Makes it glow).
- Color_T as informatively named, lets you push the color of the fluff pieces affected into a different color within the GradientIndex.
This allows you to have multiple colored fluff within the same Fluff Group.
Depending on the color mask used, you can have a maximum of at least 2 colors on a single piece of fluff. The color the fluff piece takes from where it is placed, and the Gradientindex that fits into the colormask. So a single fluff piece cant have more than 2 colors. But multiple fluff pieces can have different colors. - UV_Offset moves the ColorMask when affected.
- Surface_Offset floats or pushes the fluff pieces into its surface or out of its surface.
Target mode lets the brush either target the Vertex or Roots of the fluff piece.
Depending on the situation, change the setting, but generally suggested to keep it at Vertex.
The different sliders lets you edit your brush and how it affects and edits.
Tweak these settings to your liking.
- Radius sets the brush size. Quickly accessed with the R hotkey.
Additionally, the brush size is dependant on the camera positioning, as in, the brush size never changes its size as you move further or closer to the subject.
It stays intact according to you, and as such depending on your distance will envelope its fluff pieces wherever the brush lies.
A pseudo method to sizing your brush. - Sensitivity governs how much to affect when Click+Hold+Moving the brush across the fluff.
Have low sensitivity when doing fine details with the fluff. - Value is the more meaningful aspect of how much to affect the fluff pieces when brushing them.
- Opacity is how much the brush takes effect from its edges to the middle from the Falloff curve.
Blend modes is simply Smoothing, adding, subtracting etc.
- Add_Subtract should be your default as it lets you add (click...), and subtract (ctrl+click...) the effects when sculpting.
- Replace I dont know
- Multiply I dont know
- Smooth is quickly accessed when holding shift+click. It homogenises the affected fluff pieces to be similar (In the selected Target Property).
Falloff curve lets you decide how the brush actually looks like when making effects.
Setting the maximum affection down to its minimum. From the middle, to the edges and further out.
¶ Properties
When the Fluffgroup is selected, the properties change for important features that adds to the fluff.

- You are allowed to save the preset of the fluff (Placement, amount etc) and load one into a character.
Although the alpha mask, color mask etc will still need to be applied. - Normal Blending curve asks how the normal of the fluff blends with the normal on the character.
- MaxDistance sets the distance a fluff instance is allowed before the normal blending fades out.
- Resolution is the vertices of each fluff.
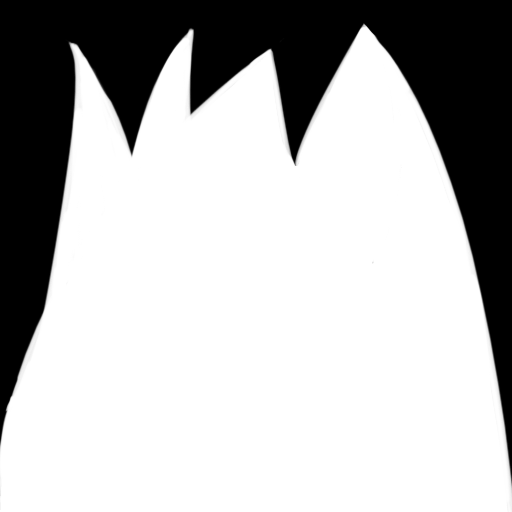
Reduce this to optimize the characters upload size in its Tris but not too low that the fluff becomes unappealing. - AlphaMask lets you upload a black and white alpha mask image (power of 2 or 512x512) to act as the shape for your fluff.
Download the provided fluff alpha mask image, save it, upload it in Fvne via Import > Texture as a mask.
Click on AlphaMask and add the uploaded image. - ColorMask is similar in that it allows colour on top of the fluff. Also a provided image for you to download and use.
- GradientIndex uses the Gradient palettes and in this case is used for ColorMask.
- You can Enable or Disable it via a check mark, as well as Mirror which it then mirrors along the X axis.
- ClothesCover check mark allows the fluff to be covered by garment when garmetn covers over the fluffs roots.
- ScaleWithSource proportionally scales the fluff to the overall size of the object by default
In the case that applied fluff is too small (usually on a part), uncheck this to make the fluff behave independently from the source in terms of size. - As always, you can name the fluff group and is wise to do so.
Usually contextually to what the fluff was used for.
¶ Provided AlphaMask and ColorMask
For reading this manual and coming to this point, download and use the Alpha mask and Color mask as simple examples of what you can do with the Fluff Appendage feature.


Next Page [Appendages - Model]